
The whole point of a website is to source new leads, and an online RFQ form lends itself really well to that goal. Plus, that’s how most of your new customers want to initiate first contact with you.
Gone are the days of calling a potential supplier to discuss a new project or a manufacturing problem. Engineers and other types of industrial buyers are fully expecting to see the classic “Get a Quote” button scattered across your website.
Assuming you have a website and a CRM (and the two platforms are integrated), it’s very easy to create a simple but powerful workflow that captures leads and notifies your sales team to follow up with them.
How to Build an RFQ Workflow
Our CRM of choice is HubSpot, which can also host websites, so the lead capturing assets like forms, landing pages, and workflows are totally native. This is a super basic workflow that we’ve used in the past to capture RFQs on your website and translate them into Leads in HubSpot.
Here’s what you’re going to “build”:
- An RFQ form
- Form placements on your website
- Workflow
All three of these are connected to deliver a seamless experience for your website visitors and the sales team responsible for following up with them once they convert through the RFQ form.
The RFQ Form
We’re calling it an RFQ form, but this is just a basic HubSpot form with basic and custom properties. Basic properties include first name, last name, company, phone number, and email address.
Custom properties are what separate a manufacturer’s CRM from your average B2B or B2C’s website, because custom properties let you create fields for part dimensions, quality requirements, material, ISO standard, etc.
RFQs vary by manufacturer, so you will need to define your own parameters. We suggest the following strategy:
Include the most baseline information you need to know to evaluate if a quote is a good fit for you, but no more. The longer a form is, the less likely a website visitor will complete it.
Once you know what information you need to capture, build these as custom properties. There are a few ways to do this, depending on how you want to associate RFQs (either by Contact or by Company).
This knowledge base article explains how to create and edit properties in your HubSpot account.
Alternatively, you can also create a Custom Object to capture RFQ data. We used this approach for a machine shop client by creating a custom object called “RFQ”. This let us associate multiple RFQs to a Contact and/or a Company, without saving over preexisting data (which is what happens if you make RFQ properties that are attached to either a Contact or Company; anytime the same contact or someone from the same company fills out the RFQ form, it will replace any previous RFQ information. This is not ideal for long-term record keeping).
Once your RFQ properties are built, you can incorporate these into your RFQ form. This knowledge base article explains how to create a HubSpot form for a HubSpot webpage.
Incorporate your default and custom properties into the form, making sure to place them in a logical sequence.
You will also want to write some kind of “thank you” message that acknowledges the RFQ has been received and that your team will be in touch shortly. Not only does it leave website visitors with that warm fuzzy feeling that their request has been heard, but it’s also an opportunity to route them to other resources on your website. Maybe that’s a company blog or a web page with technical resources, like material data sheets or cosmetic standards.
Basic RFQ Form Example
This is an example RFQ form that’s built using HubSpot’s most basic properties and form functionality, which is a great place to start if you’ve never hosted an RFQ form on your website.
This basic RFQ form captures the essential information you need to get a conversation rolling with a prospect. This is a great form to use if you don’t need or want to capture a bunch of technical information right up front.

Here’s a breakdown of the properties that populate the basic RFQ form’s field:
|
Property Name |
Object Type |
Notes |
|
First name |
Contact |
Default HubSpot property |
|
Last name |
Contact |
Default HubSpot property |
|
Company name |
Contact |
Default HubSpot property |
|
Email address |
Contact |
Default HubSpot property |
|
Phone number |
Contact |
Default HubSpot property |
|
Project description |
Company |
Custom property that’s used to capture a longer message about the project A Company property is used rather than a Contact one because it’ll associate the work with the Company, and not just that individual contact |
|
Project File |
Company |
Custom property that’s used to capture files related to a part or product (CAD, PDFs, technical drawings, etc.) |
A note on default HubSpot properties
These are super basic properties that come “out-of-the-box”, meaning you won’t have to create new properties to capture this information. It also means you can’t edit them, so you’ll need to create a new property if any level of customization is needed.
Advanced RFQ Form Example
This is an example RFQ form that’s built using that Custom Object we talked about. Some of the fields will look similar to what’s shown in the Basic RFQ form, but there are several key differences.
This advanced RFQ form captures much more detailed information (engineering and manufacturing teams who get involved in the sales process early on appreciate this) and it creates an RFQ record that’s a unique piece of data that can’t be saved over and is associated with the relevant Company and Contacts. This assists with record keeping and helps your team track new work that you win from existing customers since any future RFQ submissions won’t save over previous ones.
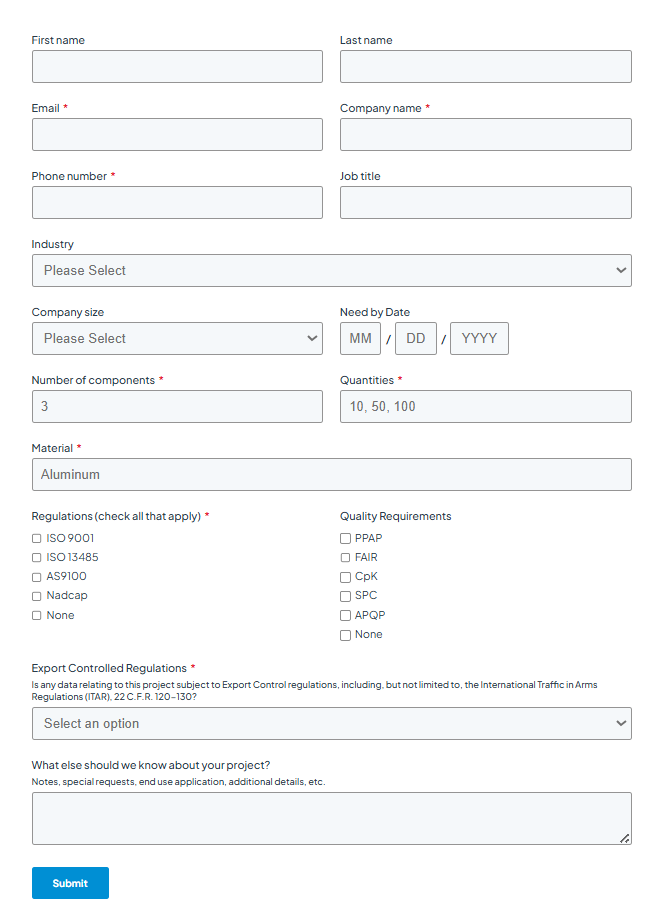
Here’s a breakdown of the properties that populate the advanced RFQ form’s fields:
|
Property Name |
Object Type |
Notes |
|
First name |
Contact (default) |
Default HubSpot property |
|
Last name |
Contact |
Default HubSpot property |
|
Company name |
Contact |
Default HubSpot property |
|
Email address |
Contact |
Default HubSpot property |
|
Job title |
Contact |
Default HubSpot property |
|
Industry |
Company (default) |
Default HubSpot property |
|
Company size |
Company |
Custom property with drop-down options |
|
RFQ # |
RFQ (custom object) |
This is a custom property for a custom object called “RFQ.” This property is actually hidden on the field and is populated in a workflow after the form gets submitted |
|
Number of components |
RFQ |
Custom property to capture quantities, a placeholder answer of “10, 50 and 100” was listed in this instance |
|
Material |
RFQ |
Custom property |
|
Regulations |
RFQ |
Custom property that allows for multi-selection |
|
Quality Requirements |
RFQ |
Custom property that allows for multi-selection |
|
Export Controlled Regulations |
RFQ |
Custom property with drop-down select with export controlled or non-export controlled options |
|
Engineering drawings |
RFQ |
Custom property for multiple file uploads This is a dependent field that only shows if the website visitor selects “No” to the Export Controlled Regulations field |
|
CAD models |
RFQ |
Custom property for multiple file uploads This is another dependent field that only shows if the project is not export controlled |
|
Project details |
RFQ |
Custom property to capture a longer message about the project |
Once the form is done and dusted, you’re ready to place it on your website.
RFQ Form Placement
This part is fun, and incredibly simple. You’re going to place the RFQ form you just created throughout your website. The most important thing to note about this step is that your RFQ form shouldn’t be accessible from just one place on your website, even if it’s a button in your header navigation that’s visible on every single page.
Buttons, hyperlinked text, and call-to-actions are your ally here – and you want to strategically place these in modules that run up, down and across each of your web pages.
The photo gallery below shows some examples of how you can place your RFQ form throughout your website.
Once the form is placed across your website, you’re officially live. And your workflow is going to be running in the background to manage the website visitors who submit RFQs and mobilize your sales team to engage them as new leads.
Let’s get into the details in the next section.
The Workflow(s)
We will actually look at three workflows, one for a basic RFQ form and two for the advanced.
Basic RFQ Workflow
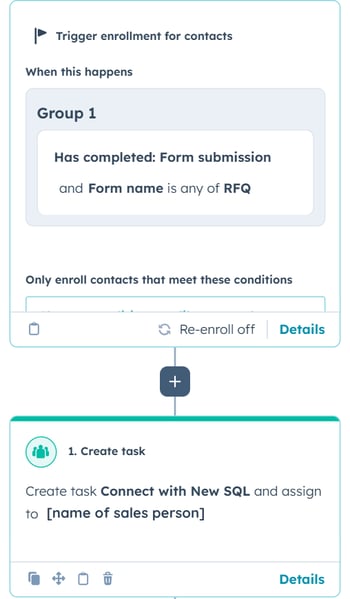
This is a very simple, lead generation workflow. Once the form is submitted, it assigns the Lead to the appropriate HubSpot user (usually a member of the sales team) and sends them a notification email. Very simple, but highly effective.
Advanced RFQ Workflow
Managing the advanced RFQ form doesn’t require two workflows, but they’ve been separated to better target actions that need to happen on the sales side and the admin side.
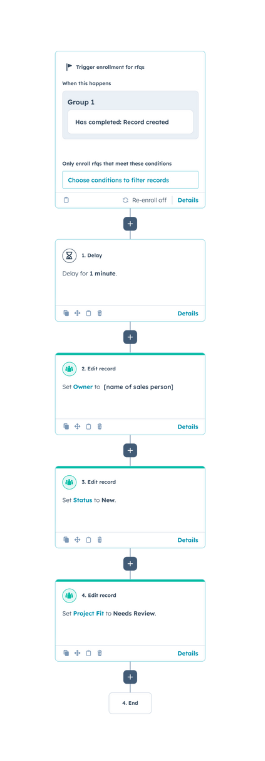
The sales workflow, similar to the Basic RFQ workflow, notifies and assigns the right user to the new Lead, while also setting the new RFQ to the right status.
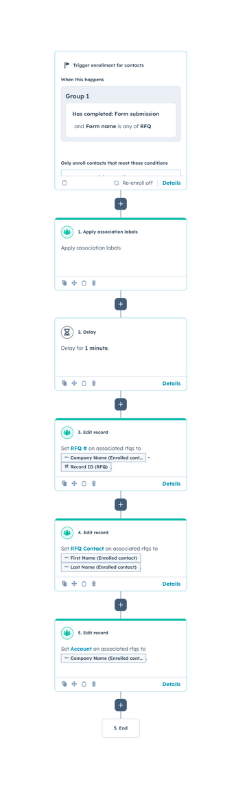
The admin workflow applies helpful association labels, assigns an RFQ number, and associates the RFQ with the new or existing Contact and Company records.
There you have it! I know in the title it says “easy,” but it may be confusing if you’ve never built native forms, record properties, or workflows in a CRM before. YouTube videos like the one linked above will be incredibly helpful to you, as will HubSpot’s Knowledge Base.
You can also contact us if you have any questions or want some advice on how to create a custom, effective RFQ form that converts website visitors and helps you capitalize on new, web-base leads. Good luck!


